Pastel de NataRecipe
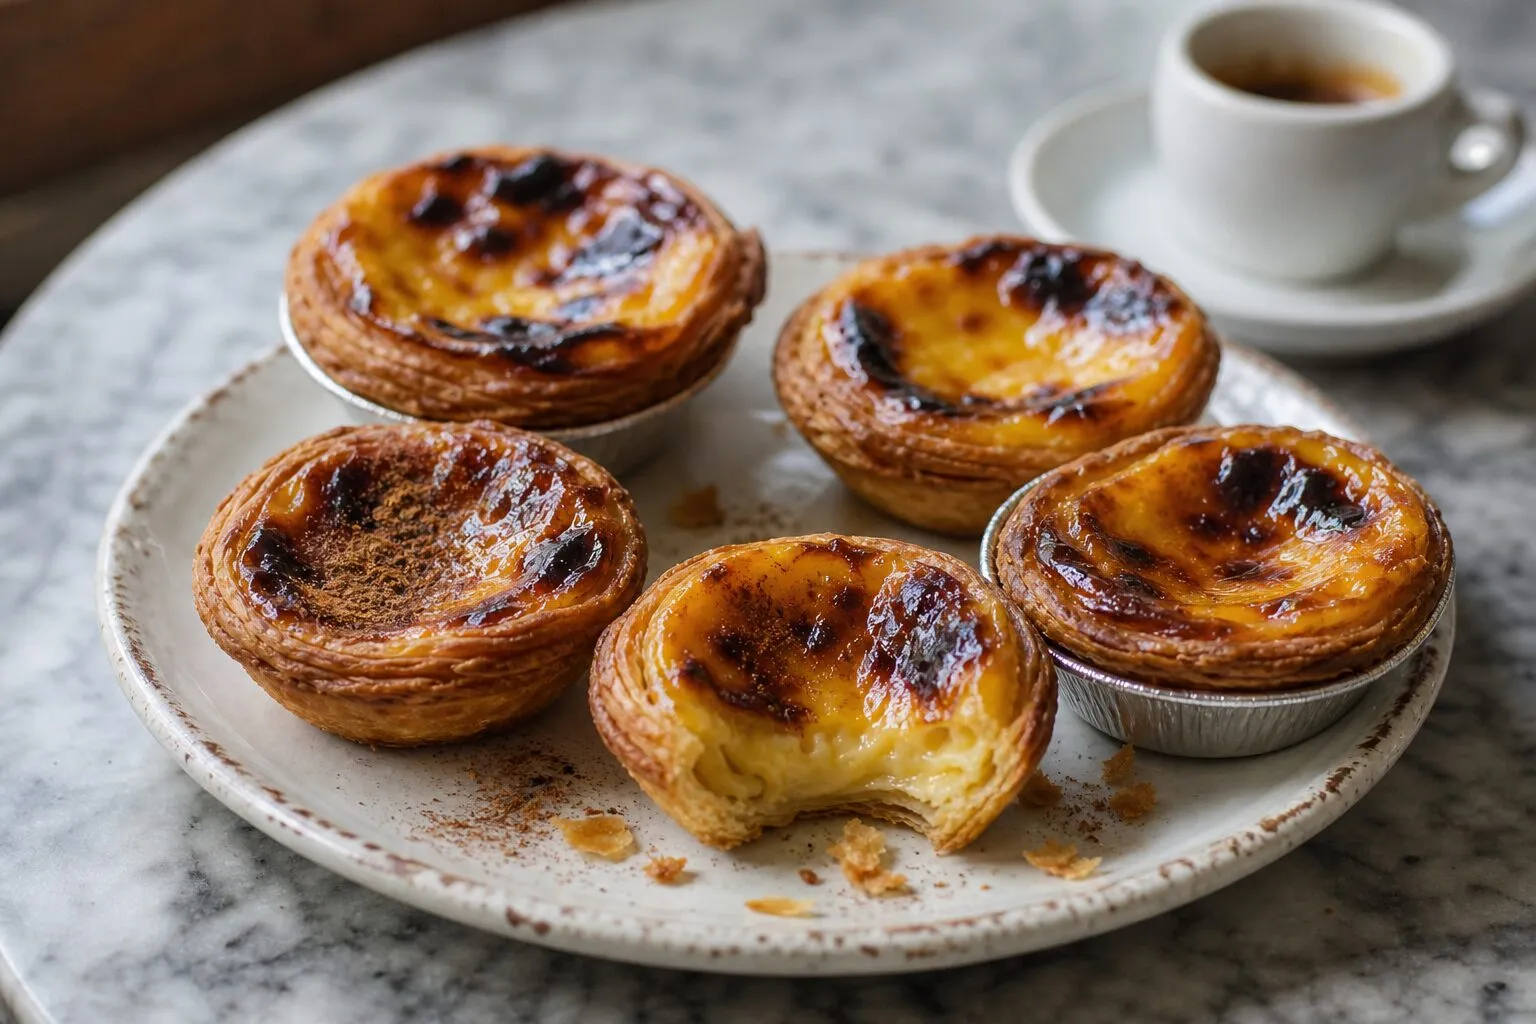
Pastéis de nata are small Portuguese tarts: a spiral of flaky puff pastry that shatters when you bite it, filled with an egg yolk custard and baked. The tops are scorched dark in places, and the custard inside is soft and creamy, scented with cinnamon and lemon.
In the workshop of one specialist shop in Lisbon, they are baked at 400°C (750°F), far hotter than a home oven, for about 15 minutes. At home, you get closer to that by setting the oven to its highest temperature, preheating the baking sheet with it, and baking on the upper rack.
What is a pastel de nata?
In Portuguese it is written pastel de nata, and the plural is pastéis de nata. Pastel means a small pastry or pie, and nata means cream (milk fat). Even so, Daniel Silva of Manteigaria, a Lisbon shop that specializes in pastéis de nata, told the Portuguese newspaper Observador that Portuguese pastéis de nata contain no cream. The filling is a custard of milk, egg yolks and sugar, thickened with flour or starch.
Beside the monastery in Belém
The pastel de nata is inseparable from Pastéis de Belém, a pastry shop in Belém, a district in the west of Lisbon. The shop’s official website explains the origin like this.
At the beginning of the 19th century, next to the Jerónimos Monastery, there was a sugar cane refinery with a small shop attached. After the liberal revolution of 1820, the country’s monasteries were closed in 1834 and the clergy and workers were driven out. To make a living, someone from the monastery is said to have started selling pastries in the shop, and these came to be called “Pastéis de Belém.” In 1837, the pastries are said to have begun to be made to the monastery’s recipe in a building next to the refinery.
This monastery origin story is the shop’s own account. The website of Lisbon’s tourism association presents the same account. None of the sources consulted for this article cite records from the time showing how the pastries were made at the monastery. The shop keeps its recipe secret and says that only its pastry makers make them, in the “secret workshop” (Oficina do Segredo).
According to Portuguese Wikipedia, the shop owns the rights to the name “Pastéis de Belém” and to the recipe, and the name is used only for the pastries it makes. Those made by other shops or at home are called pastéis de nata.
The pastry for baking at home
The three recipes from the Portuguese cooking magazine Teleculinária and the Nestlé Portugal recipe consulted for this article all use ready-made puff pastry (massa folhada). Three of them roll the pastry up tightly, slice it into rounds (one Teleculinária recipe brushes the pastry with water before rolling it), and press each slice into the tin with the fingers (the thumb). Some recipes wet the fingers or the tins with water first. This way, the spiral layers rise up along the sides of the tin.
For homemade pastry, this recipe follows the method chef Vasco Alves showed on a cooking program on the Portuguese TV channel SIC (as reported by the radio station RFM), with 3 letter folds. Vasco Alves’s method also uses margarine and lard in the pastry, but this recipe uses butter only. An article about a visit to Manteigaria’s workshop also describes folding the butter-wrapped dough 2–3 times.
The quantities for the homemade pastry (160 g all-purpose flour, 85 ml water, 120 g butter), however, were set for this article. No Portuguese source consulted gave quantities for homemade pastry, so they follow the usual ratios for French-style puff pastry: water at around 50% of the weight of the flour, and folded-in butter at 70–80% of the weight of the flour. How to make the tarts with frozen puff pastry sheets is explained under “Substitutions” below.
Pastel de Nata recipe: ingredients
Makes: 12 tarts (tins 7 cm / 2¾ in across the top, 2.5 cm / 1 in deep)Prep: 3 hr 45 min (including chilling the dough)Bake: 12–18 minutesDifficulty: Challenging
Pastry (massa folhada)
- All-purpose (plain) flour (in place of the Portuguese T55 wheat flour)160 g (about 1¼ cups)
- Salt3 g (½ tsp)
- Cold water85 ml (⅓ cup plus 1 tsp)
- Unsalted butter (melted)10 g (about 2 tsp)
- Unsalted butter (for folding in; chilled)110 g (about 1 stick)
Preparing the tins and shaping
- Bread flour (for dusting)30 g (about ¼ cup)
- Water (for brushing the pastry)15 ml (1 tbsp)
- Water (for wetting your thumb)15 ml (1 tbsp)
- Unsalted butter (for greasing the tins)10 g (about 2 tsp)
Syrup
- Granulated sugar150 g (¾ cup)
- Water70 ml (¼ cup plus 2 tsp)
- Cinnamon stick1 (about 8 cm / 3 in long, 3 g)
- Lemon peel (from an untreated lemon (skin not waxed or treated with fungicides); white pith removed)3 g (1 strip, 2 × 6 cm / ¾ × 2½ in)
Custard
- Whole milk200 ml (¾ cup plus 4 tsp)
- All-purpose (plain) flour15 g (about 2 tbsp)
- Cornstarch5 g (about 1⅔ tsp)
- Egg yolks54 g (3 large egg yolks)
To finish
- Ground cinnamon1 g (½ tsp)
- Powdered sugar5 g (2 tsp)
Equipment
- Pastel de nata (egg tart) tins (12 aluminum tins, about 7 cm (2¾ in) across the top, 4.5 cm (1¾ in) across the base and 2.5 cm (1 in) deep (about 65 ml capacity). Tins 2 cm (¾ in) deep or a muffin pan also work)
- Cooking thermometer (one that reads up to 200°C (390°F))
- Oven thermometer
- Digital scale (reads to 0.1 g)
- Rolling pin
- Pastry brush
- Whisk
- Fine-mesh sieve
- Tray (to hold the tins in the fridge)
- Baking sheet (1, preheated in the oven)
- Wire rack
Method
Make the dough
Put 160 g (about 1¼ cups) flour and 3 g (½ tsp) salt in a bowl. Add 10 g (about 2 tsp) melted butter and 85 ml (⅓ cup plus 1 tsp) cold water, mix with a rubber spatula, then bring it together with your hands. Stop as soon as the surface is smooth; don't overwork it. Shape it into a flat square, wrap it in plastic wrap and rest it in the fridge for 30 minutes.
Prepare the butter for folding
Put 110 g (about 1 stick) butter between two sheets of plastic wrap, pound it with a rolling pin, then roll it out into a 12 cm (4¾ in) square. Chill it in the fridge for 10–15 minutes, until it is firm but bends without cracking.
Wrap the butter in the dough
Dust the work surface and the dough with flour (taken from the 30 g / about ¼ cup bread flour) and roll the dough out into a 20 cm (8 in) square. Place the butter in the center, turned 45 degrees so that its corners point to the middle of each side of the dough. Fold the four corners of the dough in to the center to enclose the butter, and pinch the seams closed.
Make 3 letter folds
Roll the dough out into a long rectangle about 36 × 12 cm (14 × 4¾ in) and fold it in three like a letter. Wrap it and rest it in the fridge for 30 minutes. Next, place it with the folded edges to the left and right, roll it out the same way, fold it in three and rest it again. Do this 3 times in total. If the butter softens and starts to ooze out at any point, chill the dough right away.
Roll up the pastry
Roll the pastry out to 24 × 40 cm (9½ × 16 in), about 3 mm (⅛ in) thick, and brush off the excess flour. Brush the surface lightly with 15 ml (1 tbsp) water and, starting from a 24 cm (9½ in) side, roll it up tightly, leaving no gaps, into a log 4–5 cm (1½–2 in) across. Wrap it and chill it in the fridge for at least 30 minutes, until firm.
Line the tins
Brush the inside of the tins thinly with 10 g (about 2 tsp) butter. Cut the log into 12 slices, each 2 cm (¾ in) thick. Put a slice in the bottom of each tin with a cut side facing up, and press it out from the center toward the edges with your thumb, wetting your thumb with 15 ml (1 tbsp) water as you go. Keep the bottom thin and push the pastry up the sides until it stands 1–2 mm (1/16 in) above the rim. Set the tins on a tray and chill them in the fridge for at least 15 minutes.
Preheat the oven
Put a baking sheet on the upper rack and preheat the oven to its highest setting for 20–30 minutes: 250°C (480°F), or 300°C (570°F) if your oven goes that high.
Make the syrup
Put 150 g (¾ cup) sugar, 70 ml (¼ cup plus 2 tsp) water, the cinnamon stick and the lemon peel in a small saucepan over medium heat. Once the sugar has dissolved and the syrup comes to a boil, cook it until a thermometer reads 105–107°C (220–225°F), or for 2–3 minutes after it boils if you don't have a thermometer. Turn off the heat. Hot syrup causes deep burns if it touches your skin, so keep your face away from the pan and keep children out of the kitchen.
Thicken the milk
Take 50 ml (3½ tbsp) of the 200 ml (¾ cup plus 4 tsp) milk and whisk 15 g (about 2 tbsp) flour and 5 g (about 1⅔ tsp) cornstarch into it until there are no lumps. Heat the remaining 150 ml (½ cup plus 2 tbsp) milk in a saucepan until just below boiling, then add the flour mixture. Cook over medium heat for 1–2 minutes, whisking constantly, until thick.
Add the syrup
Take the cinnamon stick and lemon peel out of the syrup, then pour the syrup into the thickened milk in a thin stream, whisking all the time. Transfer to a bowl and let it cool to 40–50°C (105–120°F), warm to the touch, stirring now and then.
Add the yolks and strain
Beat 54 g (3 large) egg yolks and add them to the cooled custard in 3 additions, mixing well after each. Strain through a fine-mesh sieve into a measuring cup or another container that pours easily.
Fill and bake
Pour the custard into the tins until they are 70–80% full (about 38 g each). The preheated baking sheet will be around 250°C (480°F), so take it out wearing thick oven mitts, set the tins on it and bake right away on the upper rack for 12–18 minutes. The tarts are done when the custard has puffed up, dark scorch marks have appeared here and there on top, and the pastry edges are a deep golden brown. Unmold one to check that the bottom is golden brown too. The baking sheet and tins are very hot after baking, so handle them with oven mitts.
Cool and finish
Leave the tarts in the tins for 5–10 minutes, then unmold them onto a wire rack. The custard inside holds a lot of heat, so wait until they are cool enough to hold before eating them, to avoid burns. Just before serving, dust them with 1 g (½ tsp) ground cinnamon and 5 g (2 tsp) powdered sugar through a small sieve.
They are at their best once they have cooled a little but are still warm. Dust them with cinnamon and powdered sugar and serve them with a strong espresso.
The food science: why the oven goes to its highest setting
Steam lifts the pastry layers
Puff pastry is made of many thin layers of flour dough and butter stacked on top of each other. As it bakes, the water in the dough and the butter (butter is about 15–18% water) turns to steam, and its force pushes the layers apart. Food scientist Harold McGee explains that puff pastry is baked in a hot oven to release the steam all at once, before the butter melts and runs out, so that the layers set while they are lifted.
If the temperature is too low, the butter melts and soaks into the dough before the steam forms, the layers collapse and the pastry turns out heavy. Resting the dough in the fridge after each fold also keeps the butter firm in its layers and relaxes the gluten (the elastic network of protein that forms when flour is mixed with water and worked), which stops the pastry from shrinking.
The Portuguese sources give 240–300°C (465–570°F) for home baking, and Manteigaria’s workshop bakes at 400°C (750°F) for about 15 minutes. Many home ovens top out at around 250°C (480°F), so this recipe makes up the difference by preheating the baking sheet, which passes heat into the bottoms of the tins, and baking on the upper rack, close to the top heating element. A recipe by Portuguese-born chef Nuno Mendes also bakes the tarts on a baking sheet preheated at the oven’s highest setting. Some ovens that can be set to 300°C (570°F) drop back to around 250°C (480°F) within a few minutes, so it is worth checking the actual temperature with an oven thermometer.
Custard with flour in it is less likely to curdle at high heat
A custard set with eggs alone, with no starch, turns grainy and separates once it goes above roughly 80–90°C (175–195°F), because the egg proteins set too firmly. That is why baked custards such as flan or crème caramel are baked gently in a water bath.
The filling of a pastel de nata contains flour and starch. According to McGee, starch that has been heated and gelatinized (it has absorbed water, swollen and thickened) gets in the way of the egg proteins bonding tightly to each other, so the custard is less likely to curdle even if it boils. It is the same reason pastry cream stays smooth when it is brought to a boil. So even at the oven’s highest temperature, the inside stays soft and creamy while the top browns easily. The short baking time is also there to take the tarts out before the pastry burns and before the custard sets too firmly.
The food science: syrup and scorch marks
Why the sugar goes in as a syrup
Of the five Portuguese-language recipes read for this article, three first cook the sugar with water into a syrup and then add it to the milk custard. This recipe uses a lot of sugar: 150 g for 200 ml milk. Dissolving it in water first lets it mix evenly into the thickened custard. Cooking the syrup to 105–107°C (220–225°F) drives off a little water to make it thick, so that it doesn’t add too much water to the custard. Simmering the cinnamon and lemon peel in the syrup also carries their aroma into it.
The large amount of sugar has another purpose. According to McGee, sugar raises the temperature at which egg proteins set. A custard with a lot of sugar starts to set later, so it stays soft more easily during the short, hot bake.
The dark spots: caramelization and the Maillard reaction
While the tarts bake, the inside of the custard still holds water, so it hardly rises above about 100°C (212°F). The surface, on the other hand, is close to the hot heating element; it dries out and gets far hotter than 100°C (212°F).
Once the surface goes above roughly 120–150°C (250–300°F), the Maillard reaction, in which the proteins (amino acids) in the eggs and milk react with sugars, speeds up and creates a toasty brown color. Above 160°C (320°F), caramelization, in which the sugar itself breaks down and browns, also takes place. The parts that puff up highest are closest to the top element and dry out fastest, so the scorch marks tend to be patchy. If the pastry overbakes before the dark spots appear, the oven is not hot enough.
Regional variations
According to Portuguese Wikipedia, the pastel de nata also traveled to China by way of Macau, and in Chinese it is called 蛋挞 (meaning “egg tart”). Macau- and Hong Kong-style egg tarts are not covered in this article.
Substitutions
- Frozen puff pastry sheets: you can use them instead of steps 1–4. You need 360 g (about 12¾ oz) in total for 12 tarts. While they are still partly frozen, brush the surface with water and join the sheets by overlapping the edges by 1 cm (½ in). Dust with flour, roll out to 24 × 40 cm (9½ × 16 in) and continue from step 5. Some frozen puff pastry is made with margarine, so choosing one made with butter only brings you closer to the Portuguese flavor.
- All-purpose flour: used in the pastry in place of the Portuguese flour known as T55. A mix of 80 g cake flour and 80 g bread flour works too.
- Cornstarch: if you don’t have any, increase the flour in the custard by 5 g, to 20 g (about 2½ tbsp).
- Lemon peel: use an untreated lemon, avoiding any whose skin has been waxed or treated with fungicides. The white pith is bitter, so shave it off with a knife.
- Pastel de nata tins: the Portuguese recipes don’t give tin sizes, so this recipe matches the amounts of pastry and custard to tins about 7 cm (2¾ in) across the top and about 2.5 cm (1 in) deep. Shallower tins 2 cm (¾ in) deep make 16 tarts. Cut the pastry log into 16 slices 1.5 cm (⅝ in) thick, and fill each tin with about 28 g of custard (70–80% full). Bake for about 10–15 minutes.
- Muffin pan: cups 7 cm (2¾ in) across the top and 3 cm (1¼ in) deep make 10 tarts. Cut the pastry log into 10 slices 2.4 cm (1 in) thick, and fill each cup with about 45 g of custard (about 70% full). Because the cups are deeper, bake for about 15–20 minutes and check that the bottoms are browned.
Troubleshooting
- No scorch marks, and the tarts look pale all over: the oven is not hot enough. Preheat for a full 30 minutes with the baking sheet inside, and bake on the upper rack. Use an oven thermometer to check that the oven actually reaches the temperature you set.
- The pastry on the bottom is underbaked and soggy: the pastry on the bottom is too thick, or heat is not reaching the tins from below. Press the bottom out thinner than the sides, and set the tins on the preheated baking sheet.
- The custard overflowed: the tins were overfilled, or they are too shallow. The custard puffs up as it bakes, so fill the tins only 70–80% full. For tins 2 cm (¾ in) deep, divide everything into 16 as described under “Substitutions.”
- The custard looks grainy before baking: the custard was too hot when you added the yolks. After combining it with the syrup, let it cool to 40–50°C (105–120°F) before adding the yolks.
Storage
- Room temperature: they are best eaten on the day they are baked. The pastry gradually turns soft.
- Fridge: keep them in an airtight container for up to 2 days. Before eating, warm them in a toaster oven at 200°C (390°F) for 3–5 minutes to bring back the crisp pastry.
- Freezer: wrap the rolled pastry log from step 5 in plastic wrap and freeze it for up to 1 month. Thaw it in the fridge, then continue from step 6.
More from Spain & Portugal
Sources
- Teleculinária, “Pastéis de nata” (Portuguese)
- Teleculinária, “Receita de pastéis de nata” (Portuguese)
- Teleculinária, “Pastel de Nata” (Portuguese)
- Saboreia a Vida (Nestlé Portugal), “Pastéis de Nata” (Portuguese)
- RFM, “Pastéis de nata feitos em casa: o guia prático para acertar à primeira” (Portuguese)
- Observador, “Isto são pastéis de nata que se apresentem, BBC?” (Portuguese)
- Echo Boomer, “Uma visita à fábrica dos pastéis de nata da Manteigaria” (Portuguese)
- Pastéis de Belém, “História” (Portuguese)
- Visit Lisboa, “Pastéis de Belém” (Portuguese)
- Wikipédia, “Pastel de nata” (Portuguese)
- Country & Town House, “Recipe: Nuno Mendes' Portuguese Custard Tarts” (English)
The text and recipe were put together independently after comparing the sources above.